First Kernel Mode Driver
If you have accurately followed the installation instructions outlined in the introduction,
you should find the "Kernel Mode Driver, Empty" template in Visual Studio
Create a new project using this preset
In the "Driver Files" section, locate the .inf file and delete it
Afterward, create a new C++ source file with the name of your driver, for example, test_driver.cpp
The ntddk.h header file provides essential functionality and structures required for developing kernel-mode drivers.
#include <ntddk.h>
Learn more about the ntddk.h header file on Microsoft’s documentation
Driver Entry
extern "C" NTSTATUS
DriverEntry(_In_ PDRIVER_OBJECT DriverObject, _In_ PUNICODE_STRING RegistryPath)
{
  return STATUS_SUCCESS;
}
-
extern "C"is a C++ language feature that specifies the function should be treated as if it were declared in the C programming language. Learn more aboutextern "C"and function declarations. -
NTSTATUSis a data type representing the status of an operation in Windows kernel programming. It is aLONGvalue where zero typically indicates success, and non-zero values indicate various error conditions. See more onNTSTATUSvalues. -
DriverEntryis the entry point for Windows kernel-mode drivers. The operating system calls this function after loading the driver to initialize its data structures and perform setup tasks. Read more about theDriverEntryfunction for KMDF drivers. -
PDRIVER_OBJECTis a pointer to a structure that represents a driver in the Windows kernel. Explore theDRIVER_OBJECTstructure. -
PUNICODE_STRINGis a pointer to a structure representing a Unicode string in the Windows kernel, often used to reference a registry path relevant to the driver. Learn more about theUNICODE_STRINGstructure.
annotations like _In_ and _Out_ are not strictly required for compilation
but are recommended to improve code clarity
and help static analysis tools understand the intended use of function parameters.
_In_indicates that the parameter is an input to the function and shouldn’t be modified by the function._Out_specifies that the parameter is used to return data from the function to the caller.
These annotations enhance code readability and can help catch potential bugs during development. Learn more about SAL and its uses.
Driver Unload
To ensure proper memory management, we will define a function that automatically undoes all changes made by the driver upon unloading. This will prevent any potential leaks from persisting beyond the driver's use.
void
TestUnload(_In_ PDRIVER_OBJECT DriverObject)
{
}
the pointer to the unload function must be set using the DriverUnload member of the DriverObject
DriverObject->DriverUnload = TestUnload;
Simple Debug Output
DbgPrint
DbgPrint("Output\n");
DbgPrint It allows you to print messages to the debugger output in both types of builds
KdPrint
KdPrint(("Output\n"));
KdPrint is often implemented as a macro, and it is typically included in debug builds but excluded in release builds
Download Project
You can download the driver example project from here:
simpleWinDriver
Starting the Driver
To enable driver testing on your test machine, you’ll need to activate test-signing mode. This allows the installation and running of unsigned drivers:
bcdedit /set testsigning on
Next, create the driver service using the sc (Service Control) command:
sc create <drivername> type= kernel binpath= "<path to driver.sys>"
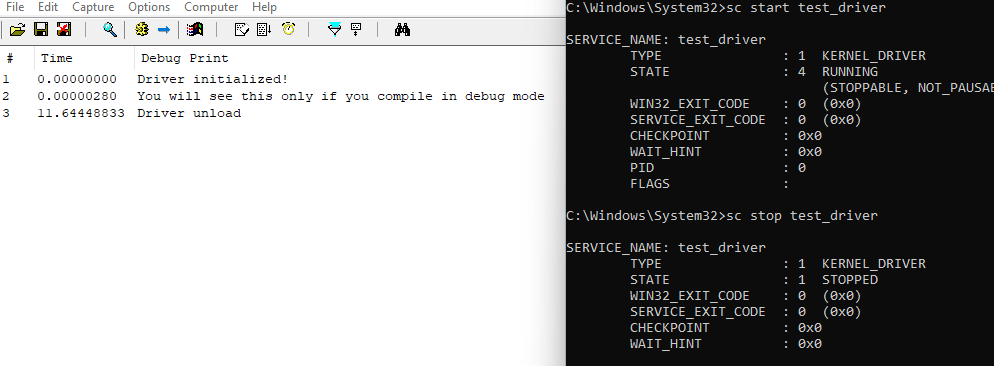
To start the driver, use the following command:
sc start <drivername>
You can stop the driver with:
sc stop <drivername>
If you need to remove the driver, use:
sc delete <drivername>
Note: Ensure that the driver is stopped before attempting to delete it, as active drivers cannot be removed.
Detailed guide on using sc create for service creation
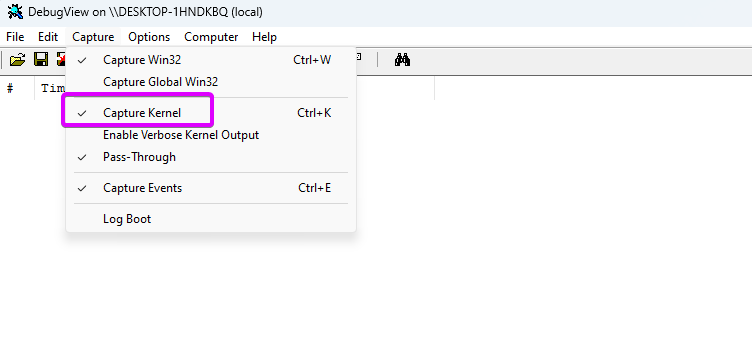
To verify the functionality of your driver and capture debug output, you can
use DebugView in administrator mode.
By recording kernel events, you can monitor the messages generated by functions like DbgPrint or KdPrint.
To enable the capture of debug output from your driver using DebugView, you need to configure the Debug Print Filter in the Windows Registry.
Navigate to
HKEY_LOCAL_MACHINE\SYSTEM\CurrentControlSet\Control\Session Manager\Debug Print Filter
(you may need to create it).
Create a DWORD value named DEFAULT and set its value to 8.
After making these registry changes, it's necessary to restart the computer for the modifications to take effect.


Additionally, you can confirm the successful installation of your driver by checking the Windows Registry.
Specifically, navigate to HKEY_LOCAL_MACHINE\SYSTEM\CurrentControlSet\Services and look for the entry corresponding to
your driver name. A valid installation should result in the presence of the driver's registry entry at this location
